3D Scene menu
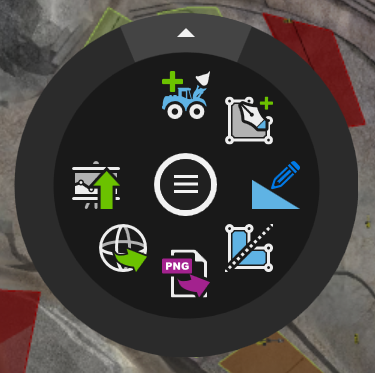
Right-click in the 3D Scene, away from Activity Areas or Resources, to display a radial menu that has the following options.
The radial menu may look slightly different depending on how the system is configured.
| Item | Field (shortcut) | Description |
|---|---|---|

|
Insert Resource (R key) |
Resources that have been defined in XECUTE Config can be added to the 3D Scene. Once in the scene, the resource is available to be assigned to one or more activity areas. See Allocating a Resource. |

|
Draw Activity Area (A key) |
Allows you to draw an Activity Areaon the 3D Scene. Click to start an Activity Area and continue to draw points by clicking. To close the Activity Area, double-click the left mouse button or press Enter on the last point. See Drawing Activity Areas. |

|
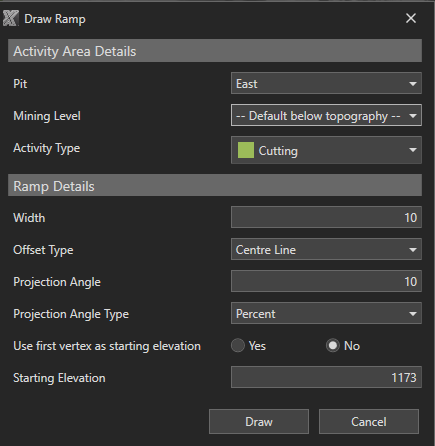
Draw Ramp (D key) |
Allows you to design ramps. The created ramp solid represents the material to be mined to achieve the ramp surface. See Ramp design.
|

|
Divide |
Activity areas can be divided along a user-defined cutting plane. See Divide the activity area. Click once in the scene outside the activity area to start the split line. Move the mouse to draw the split line segment, use a single click to end the split segment and double-click to terminate the split line. The split portion that contains the start of the mining direction will keep its name and the other portion will be renamed after the first and appended with _number. |

|
Export Scene to Image | The Image Exportfunction takes a snapshot of the 3D Scene and exports it as a file for use in communicating and designing planning information. Available formats are .png, .jpeg, .jpg and .bmp. |

|
Export Stage Plans | Exports the current as-built surface (topographical surface with the current face positions of all Activity Areas and optionally, dump surfaces). To export a stage plan, run the schedule to the desired point in time, open the 3D Scene radial menu and click the Export Stage Plans icon. See Stage Plans. |

|
Publish |
Data Feed Out. To publish data from XECUTE Client there is a single icon in the radial menu. This allows you to select which Data Feed Out to publish by selecting the check box. If a Data Feed Out is invalid for any reason it is greyed out. Selections are remembered between sessions and are saved per site. The Publish as a batch option will mark all published datasets with an ID that can be used to group them in EPF reports. This option is a temporary feature, as an enabled batch ID will break Data Feed Out triggered enterprise events. In future releases, all datasets will include a batch ID by default and work with enterprise events.
|